Showing posts with label Tutorial. Show all posts

Wednesday, April 13, 2011

Veggie Juicing

I have always wanted to make veggie juice....but never had a juicer to do so...luckily I am silly and thanks to fellow blogger Sayward at Bonzai Aphrodite I now know that I do not need one!! woo!!

Here is my version of her tutorial

mmmm...fresh veggies....I used leftover Kale, cucumber, carrot, and an orange


Throw them all in the food processor with some water (I added some orange juice also)


and take them for a spin ;)


dump it all in cheese cloth (or like material) over a big bowl


and squeeze, squeeze, squeeze! (just when you think you have gotten all the juice, squeeze some more!)


pour in to a glass (a funnel is helpful, but I don't have one...so I lost a bit in the pour :( )

and omg....YUM! and ZING!


be sure to save the pulp (I am going to add it to our sunday muffins this week)


and LOOK, even big kids like it :D


in fact he liked it so much that he was in much distress when I told him I drank the rest - so we made do with a quick version with strawberries...


I feel great, kiddo loves it.....I think I'm convinced!

Friday, June 11, 2010

Sewing for Kiddo (Boys Tank Top Tutorial)

Can I tell you how hard it is to find tutorials for cute boys clothes out there!! I had an urge to make a simple tank top for the kiddo after work, and I only found ONE! and to be honest.....I had a hard time understanding the sizing....hmn

Sooo I decided that I could do this on my own!! I know I am very empowered right :D

Here's my process.....any suggestions will be well received!

I started out with a favorite tank of kiddo's, folded it in half, and cut around (the fabric is a thrifted pillow case)


With extra cut at the bottom and sides for seam allowance


Cut two of those on the fold (and cut about 1/2 an inch more out of the neck line to leave room for the bias binding)


Make bias binding for neck and arm holes, mine turned out to be 2 1/2 in x 18 in

**Edit for the bias binding**

I was corrected by my mother.....bias binding should be cut at a 45 degree angle...thus making it "on the bias" so that it will stretch! Like this or this

Thanks Mom!! I was wondering why it was a tight squeeze over his head!!


Sew the right sides of one of the shoulder seams together (just one!)


Pin RIGHT side of binding to the WRONG side of the neck hole and sew together
(I dont have a fancy binding maker and this way works out best for me)

Here is another explanation


Once that side is sewn, flip the garment over, then make sure the bias binding is folded so you can see the wrong side facing up. Fold the binding in half like so


Fold binding again, this time over the seam, and pin all along the neck hole (covering the exposed seam)


Top stitch close to edge of the binding (sewing through binding and garment fabric

Repeat this binding process for the arm hole under the shoulder seam already sewn together


Sew the other shoulder seam together and repeat binding process for that armhole


Sew down the sides of the garment (I like to start at the arm hole and sew down)


Fold over the bottom edge 3/8 in and then fold over again 1/2 in, pin, and sew


(funny how the light changed on this last photo....its a totally different color!)

Enjoy watching your little one play in their nice, cool, summer top!


Let me know if you try it :D

Wednesday, January 13, 2010

Paper Mache Dinosaur Tutorial

So you all should know that kiddo is obsessed with dinosaurs! He knows so many names (its pretty hilarious to hear a 3 year old sing about Giganotosaurus, or stumble on Parasaurolophus). We support this obsession in many ways, books, documentaries, models....etc....

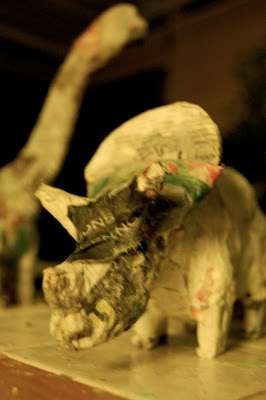
So in keeping with this, kiddo and I made some Paper Mache Models of our own! Here is the tutorial! (bear with me, I am still learning how to create these!)

Start by watching this video from Martha Stewart that gave me the basic structure idea

So cut out the basic body shape of your favorite dinosaur from cardboard, with out the extras like legs, horns, spikes, etc...


(these have the legs glued on already, but imagine them without)

Cut out legs and two small round disks for each leg. Have a kiddo help you glue the disks together - so you end up with 4 stacks of 2 disks each. (hint: Triceratops and Stegosaurus have longer back legs than front, but Brachiosaurus has longer front legs than back!)


Glue the legs on placing them on top of each disk stack...


The disks make the shape 3-D!

After the glue dries, you will want to prepare your paper mache "goop" (a kiddo term). I use flour and water (+a pinch of salt), mixed to create a liquid consistency (not too watery). You can also use a glue and water mixture, but again, not too watery ;)

In the video they use a pre-made paper mache powder, but if you are like me with newspapers lying around, they work just as well. I tend to like the texture they provide also :) If you use newspaper, rip it up into 2 in wide by 6 in long strips (approximate!!)

Start by securing the leg joints by wrapping the disks first....use a few layers....


Let that layer dry....and then start adding the bulk of the body...dip a strip of newspaper into the "goop" and make it into a ball, this adds bulk quickly...


Let this layer dry while you cut out all the extra parts, (a collar for Triceratops, plates for Stegosaurus). Horns and spikes can be made with the paper mache itself.

I glued the plates on....but stuck the collar of the Triceratops into the paper mache...


After this bulk layer dries wrap the whole dino in one last (flat) layer of paper mache to make it smooth...


Last step! Have a kiddo pick the colors and paint paint paint!


Done :) Yay!!

Wednesday, December 30, 2009

Show and Tell (Part Two) & Recycled Legwarmer Tutorial!

This ones for the sista's! The sister in law had a big trip coming up to attend cooking school in Italy (ooohhh) so I wanted to make her something travel related, and small......and what did my search reveal? A perfect little set of a lingerie bag, shoe bag and passport cover, in (to me) Tuscany style ;)


Originally got the ideas here and here...

and for my littlest of sisters.....some coziness for the rest of the winter!

Re purposed sweater sleeves, into legwarmers!


Looks like a couple of happy customers to me :)

Here is a quick tutorial for the legwarmers...

Cut a strait line starting right at the underarm seam,


then fold over and zig-zag stitch the cut side (I do two rows of zig-zag because I am paranoid about unraveling :P). Its also helpful to scrunch the knit as you sew, otherwise you will end up with a splayed out cuff! (unless that is what you are going for...)


that's it! I told ya it was quick ;)

Monday, December 28, 2009

Show and Tell (Part One)

Ahhhh.....the week after Christmas off of work....gives me some time to catch my breath after the holiday madness...we have been hanging out in our jammies all day, feels good!

Last week there was no time for blogging, my house was covered in cardboard, yarn, glue, contact paper, you name it.....I badly wanted to give you all a sneak peek of all that madness, but I just couldn't pull myself away.

So now, the show and tell begins, I can't wait to pass along some of the great ideas I found!

First up.....Kiddo's Cardboard Kitchen!!!


Complete with cotton yarn burners, and a thrifted bowl for the sink....


an oven too!


I still have to finish off the edges, and add a faucet.....of course!

Thanks so much to Anna at Forty Two Roads for her incredible work on the tutorial available on Etsy!

This tutorial is easy to understand but make no mistake....it takes some time and will buff up your arms with all that cardboard cutting!!

Kiddo loves it, but I get the feeling he still prefers the real thing!

Tuesday, December 8, 2009

Finished!!!

Remember the project that had 3 (count em'..3) sewing machines stumped?

Welll....I finally managed to get ahold of an upholstery machine and got....it....done!


I can't wait to get photos of this cutie (seen here in the belly) in her custom Mei Tai......hope you enjoy the ride!

Thanks to Kristen for the amazing tutorial.....I am learning so much from all these incredible women!

Tuesday, July 7, 2009

Pea Pod Purse

Remember this pretty fabric? Well I finally turned it into something!

I am proud to announce my first blog contest winner, AnnMarie, received this pretty spring/summer purse.


The pattern is the Pea Pod Purse from Ottobre Design! Thanks!


Made from reclaimed fabric, this purse is very "green"....it includes a zipper pocket on one side and two sizes of open pockets on the other.


I gained two valuable sewing skills during the process, how to sew binding and invisible zippers (on a curved seam mind you!)


No worries Jessica....yours is coming soon!!