Packing and Thrifting.......that pretty much sums it up :)
Found these treasures at a Haiti Relief Fundraising Sale....isn't that Tea Pot the Best!!
oh.....and the boxes.....they are everywhere!
In between all that there was bit of crafting, reading by the fire, and playing dinosaurs....but no pictures of all that ;)
Sunday, January 31, 2010
Tuesday, January 26, 2010
15 Minutes
Let me be honest....I have be quite overwhelmed lately....so I snuck in 15 minutes of quiet by the fire last night.
Ahhhhh, that helped.
My brain swirls with ideas sometimes....so maybe you guys won't mind me dumping some of them on you!
We are in the process of buying a house.....oh so exciting! but if you have bought a house you can sympathize, it takes over your whole life!
Here are some things that have been inspiring me (and keeping me up at night!)
I want these for my countertops....but they are pricey (maybe I can ask my dad to make some.....ehem, dad??)
Pegboard....I'm all over it!
Loving this space saving DIY bookshelf
Look at this simple idea!
I am going to try using (or maybe making?) Milk Paint :)
Along with all that....my first craft fair is coming up! Woah....what did I get myself into?? Although I found some fabulous fabric at the thrift store this weekend......can I tell you....I have a new obsession for pillow cases!
Whew! Thanks!
Whats inspiring you lately?
(oh! I just realized I need to change my banner o_0)
Wednesday, January 13, 2010
Paper Mache Dinosaur Tutorial
So you all should know that kiddo is obsessed with dinosaurs! He knows so many names (its pretty hilarious to hear a 3 year old sing about Giganotosaurus, or stumble on Parasaurolophus). We support this obsession in many ways, books, documentaries, models....etc....
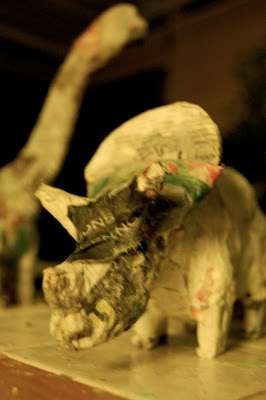
So in keeping with this, kiddo and I made some Paper Mache Models of our own! Here is the tutorial! (bear with me, I am still learning how to create these!)
Start by watching this video from Martha Stewart that gave me the basic structure idea
So cut out the basic body shape of your favorite dinosaur from cardboard, with out the extras like legs, horns, spikes, etc...
(these have the legs glued on already, but imagine them without)
Cut out legs and two small round disks for each leg. Have a kiddo help you glue the disks together - so you end up with 4 stacks of 2 disks each. (hint: Triceratops and Stegosaurus have longer back legs than front, but Brachiosaurus has longer front legs than back!)
Glue the legs on placing them on top of each disk stack...
The disks make the shape 3-D!
After the glue dries, you will want to prepare your paper mache "goop" (a kiddo term). I use flour and water (+a pinch of salt), mixed to create a liquid consistency (not too watery). You can also use a glue and water mixture, but again, not too watery ;)
In the video they use a pre-made paper mache powder, but if you are like me with newspapers lying around, they work just as well. I tend to like the texture they provide also :) If you use newspaper, rip it up into 2 in wide by 6 in long strips (approximate!!)
Start by securing the leg joints by wrapping the disks first....use a few layers....
Let that layer dry....and then start adding the bulk of the body...dip a strip of newspaper into the "goop" and make it into a ball, this adds bulk quickly...
Let this layer dry while you cut out all the extra parts, (a collar for Triceratops, plates for Stegosaurus). Horns and spikes can be made with the paper mache itself.
I glued the plates on....but stuck the collar of the Triceratops into the paper mache...
After this bulk layer dries wrap the whole dino in one last (flat) layer of paper mache to make it smooth...
Last step! Have a kiddo pick the colors and paint paint paint!
Done :) Yay!!
So in keeping with this, kiddo and I made some Paper Mache Models of our own! Here is the tutorial! (bear with me, I am still learning how to create these!)
Start by watching this video from Martha Stewart that gave me the basic structure idea
So cut out the basic body shape of your favorite dinosaur from cardboard, with out the extras like legs, horns, spikes, etc...
(these have the legs glued on already, but imagine them without)
Cut out legs and two small round disks for each leg. Have a kiddo help you glue the disks together - so you end up with 4 stacks of 2 disks each. (hint: Triceratops and Stegosaurus have longer back legs than front, but Brachiosaurus has longer front legs than back!)
Glue the legs on placing them on top of each disk stack...
The disks make the shape 3-D!
After the glue dries, you will want to prepare your paper mache "goop" (a kiddo term). I use flour and water (+a pinch of salt), mixed to create a liquid consistency (not too watery). You can also use a glue and water mixture, but again, not too watery ;)
In the video they use a pre-made paper mache powder, but if you are like me with newspapers lying around, they work just as well. I tend to like the texture they provide also :) If you use newspaper, rip it up into 2 in wide by 6 in long strips (approximate!!)
Start by securing the leg joints by wrapping the disks first....use a few layers....
Let that layer dry....and then start adding the bulk of the body...dip a strip of newspaper into the "goop" and make it into a ball, this adds bulk quickly...
Let this layer dry while you cut out all the extra parts, (a collar for Triceratops, plates for Stegosaurus). Horns and spikes can be made with the paper mache itself.
I glued the plates on....but stuck the collar of the Triceratops into the paper mache...
After this bulk layer dries wrap the whole dino in one last (flat) layer of paper mache to make it smooth...
Last step! Have a kiddo pick the colors and paint paint paint!
Done :) Yay!!
Saturday, January 9, 2010
What a day!
An exhausting day, but turning three is worth it!
Dinosaurs were everywhere! I had to make a special shirt worthy of his favorite dino....stegosaurus :)
and kiddo and I worked all week on these paper mache dino's (tutorial coming right up!)
of course I didn't catch a photo of him in his custom stegosaurus hat......but no worries that tutorial is coming soon too ;)
but back at the party.....there was good friends, family, and swimming!!! yes even in January!
Oh....what a day!
Sunday, January 3, 2010
Sledding! Happy Winter ;)
Subscribe to:
Posts (Atom)